Building Custom Elements with Web Components for the 2020 Elections
I don’t know if you knew this, but there’s an election going on. There are approximately 89 people in the democratic race and a lot of primaries coming up that could determine the future of our country. So when PBS NewsHour came to us at Upstatement to build some graphics and charts that they could use on their website and broadcast, we knew the future of the nation rested solely on our shoulders.
The NewsHour need: clear, reliable, live election graphics
From the Iowa Caucuses to the general in November, elections have fast-unfolding results and ever-changing insights. The team at PBS NewsHour needed graphics that could tell those stories clearly with the latest data and a minimal workflow; they couldn’t rely on making laborious, slow charts manually. Our job was to create graphics that could get the latest data, display it, and update it live.
These graphics needed to show up on the PBS NewsHour broadcast, their website, local affiliates’ websites, and social media feeds. Editors needed a way to quickly look through data, filter it, switch between races, and queue up images to speak about on the broadcast. How could we build one tool that did all of this and would work on any website?

The Solution: Web Components
The first thing we realized is that we weren’t going to create something in a framework or within a WordPress plugin. These graphics had to be easily dropped onto any website without hosting a node app or managing a build pipeline. Everyone at the NewsHour is extremely busy and asking them to manage yet another system would have added too much to their plates.
That’s why we landed on Web Components. We would simply build all of our components into one JavaScript file and all they had to do was add one script tag to their site to drop any component on any page.
<script src="http://someurl.biz/components.js"></script>
Web Components also solved the problem of local style rules on any given website with the Shadow DOM. This meant that we could style our components and not have to worry about any global CSS from the consuming website. The end result was an HTML element they could put anywhere that would get the most up-to-date results and chart it for them:
Building Web Components from scratch
It all sounds nice on paper. One JavaScript file and we have a styled component we can drop anywhere! But how do we actually go about building one? How do we do it without the use of a big library (that could increase our bundle size by a lot)?
Let’s start with a simple example of how to build a web component from scratch. Since elections are stressful and confusing enough, we’ll make something simple: a component that displays the portrait of a single candidate! (Everything we did for PBS NewsHour follows the outlines of this example)
So, where do we start? Let’s say we wanted to create a component that allowed us to add pictures of the candidates to our site. First, we start by creating a custom class in JavaScript:
class CandidateImage extends HTMLElement {}
HTMLElement is part of the default JavaScript spec and it has four lifecycle callbacks that we can take advantage of (other than the default constructor).
connectedCallback— invoked when the element is appended to the main document.disconnectedCallback— invoked when the element is disconnected from the DOM.adoptedCallback— invoked when the element is moved to a new document (we won’t cover this in this blog post)attributeChangedCallback—invoked when an attribute is updated, added or removed.
When building components, the most common one you will use is connectedCallback. You typically want to have anything related to updating the markup here. For our CandidateImage component, this would be where we create our image:
class CandidateImage extends HTMLElement {
  connectedCallback() {
    console.log('Adding a candidate!');
    this.innerHTML = '<img src="https://cdn-candidates.com/bernie.jpg" />';
  }
}
This sets up the innerHTML of our element to be an image of Bernie Sanders. But in order to use this in HTML, we have to actually register this as a custom element. We can do this with the customElements API by calling the define method. However, we want to make sure this happens after the document has loaded. We can update our component code:
class CandidateImage extends HTMLElement {
  connectedCallback() {
    console.log('Adding a candidate!');
    this.innerHTML = '<img src="https://cdn-candidates.com/bernie.jpg" />';
  }
}

/**
 * Register our custom element
 */
window.addEventListener('DOMContentLoaded', () => {
  customElements.define('candidate-image', CandidateImage);
});
Now we can add a candidate-image element on any page that pulls in our component.js file (note that all custom elements must have a dash in their name).
<candidate-image></candidate-image>

Bam! We have a custom component. But there’s still a problem: global styles will still apply to our component. Like this:
img { display: none; }
This rule would hide our picture of Bernie Sanders even though it may have been written for something else entirely.
The Shadow DOM
This is when the Shadow DOM comes into play. It essentially allows us to create a document inside of the current document and hide it from any global CSS. And it just requires one extra step on our component:
class CandidateImage extends HTMLElement {
  connectedCallback() {
    this.shadow = this.attachShadow({ mode: 'open' });

    // Create an image
    const image = new Image();
    image.src = 'https://cdn-candidates.com/bernie.jpg';

    // We can use appendChild just like we do the normal document
    this.shadow.appendChild(image);
  }
}

/**
 * Register our custom element
 */
window.addEventListener('DOMContentLoaded', () => {
  customElements.define('candidate-image', CandidateImage);
});
All we have to do is call this.attachShadow() and our HTMLElement will have it’s own shadow DOM! We save it as this.shadow so that we can access it later (if we need to). It is very similar to working with a normal document. We can query elements via this.shadow.querySelector('img') or use appendChild and other similar methods you’d expect on the document. It is literally a document inside the document.
Now, that global CSS rule that hides all images won’t affect our component! Our picture of Bernie is safe.
Setting Attributes
Our component displays Bernie’s portrait perfectly, but it doesn’t really do anything. It would be nice if we could use this component to display any candidate we wanted. This is when attributes come into play. We could pass our component a name and it would find the appropriate image for us.
Just like any HTML element, we can call getAttribute in our class to get a certain attribute set on our element. For example, say we add this to our page:
<candidate-image name="pete"></candidate-image>
Then we could look at the value of the name attribute in our component and pull up the correct image.
class CandidateImage extends HTMLElement {
  connectedCallback() {
    this.shadow = this.attachShadow({ mode: 'open' });

    // Create an image
    const image = new Image();

    // Find the right image for the provided name
    if (this.getAttribute('name') === 'pete') {
      image.src = 'https://cdn-candidates.com/pete.jpg';
    } else if (this.getAttribute('name') === 'bernie') {
      image.src = 'https://cdn-candidates.com/bernie.jpg';
    }

    // We can use appendChild just like we do the normal document
    this.shadow.appendChild(image);
  }
}

/**
 * Register our custom element
 */
window.addEventListener('DOMContentLoaded', () => {
  customElements.define('candidate-image', CandidateImage);
});
Now we can load the image for Pete Buttigieg.

Handling internal styles
We covered how to hide our component from global styles, but how exactly do we add styles to our components? While researching the Shadow DOM, we came across a property called adoptedStyleSheets which seemed promising. It accepts a style sheet object and attaches it to our Shadow DOM. Kind of like this:
const styleSheet = new CSSStyleSheet()
styleSheet.replaceSync('img { backgroundColor: 'white' }');
...
this.shadow.adoptedStyleSheets = [styleSheet];
The problem is that “constructable stylesheets” only work in Chrome as of this writing. So, we had to go with a solution that work for all browsers (especially because many of PBS NewsHour’s users use IE11)...
Instead, we simply create a style element and add it to the shadow document ourselves. For our candidate-image example, let’s make it so we can mark a candidate as a “winner” by specifying a status.
class CandidateImage extends HTMLElement {
  connectedCallback() {
    this.shadow = this.attachShadow({ mode: 'open' });

    // Create an image
    const image = new Image();

    // Find the right image for the provided name
    if (this.getAttribute('name') === 'pete') {
      image.src = 'https://cdn-candidates.com/pete.jpg';
    } else if (this.getAttribute('name') === 'bernie') {
      image.src = 'https://cdn-candidates.com/bernie.jpg';
    }

    // We can use appendChild just like we do the normal document
    this.shadow.appendChild(image);

    // If the status is `winner` then add some text
    if (this.getAttribute('status') === 'winner') {
      this.addWinnerText();
    }

    // Add our styles
    this.createStyles();
  }

  /**
   * Adds text to our image indicating a winner
   */
  addWinnerText() {
    const winnerSpan = document.createElement('span');
    winnerSpan.classList.add('winner');
    winnerSpan.innerText = 'Winner!!!';
    this.shadow.appendChild(winnerSpan);
  }

  /**
   * Create the styles for our candidates
   * We do this as a normal string rather than using @import
   * since it is not supported in all browsers
   *
   * (same for new CSSStyleSheet, which is only supported in Chrome)
   */
  createStyles() {
    const styleTemplate = `
    <style>
    .winner {
      position: absolute;
      color: white;
      font-size: 30px;
      top: 10px;
      left: 160px;
      height: 30px;
      font-weight: 800;
      text-transform: uppercase;
    }
    </style>`;
    this.shadow.innerHTML = styleTemplate;
  }
};

/**
 * Register our custom element
 */
window.addEventListener('DOMContentLoaded', () => {
  customElements.define('candidate-image', CandidateImage);
});
Now, we can indicate when someone has won!
<candidate-image name="pete" status="winner"></candidate-image>

It’s not styled very well, but you get the point.
As one aside, I wanted to note that @font-face CSS rules do not work in the Shadow DOM. We had to write something to add our fonts to the actual document in order for them to be honored. Funny enough, the only browser that supported @font-face in the scoped components was mobile safari… go figure 🤷♀️
Observing live changes
So, we have our styled web component working as expected for the initial render. But what if we update the status manually without refreshing the page?
document
  .querySelector('candidate-image')
  .setAttribute('status', 'not winner');
The component doesn’t actually do anything here because it doesn’t know how to observe these changes. That is when attributeChangedCallback comes into play. By default, our component doesn’t observe any changes — after all, a component may have a ton of logic and it couldn’t reasonably know what to do without us telling it. So, we need to indicate what happens when a user manually changes the status on our component.
In order to do that, we have to first specify which properties we want to observe. That is done in the static getter observedAttributes which needs to return an array listing the properties we want to watch:
static get observedAttributes() {
  return ['status'];
}
Then we can tell attributeChangedCallback what to do when a new change has come in:
attributeChangedCallback(name, oldValue, newValue) {
  if (name === 'status') {
    // do something
  }
}
All we need to do is remove the winner text if the status is not winner. Our updated component would look like this:
class CandidateImage extends HTMLElement {
  connectedCallback() {
    this.shadow = this.attachShadow({ mode: 'open' });
    this.setupImage();
    this.addWinnerText();

    // Add our styles
    this.createStyles();
  }

  /**
   * This function is called whenever an attribute we are observing
   * is updated.  We specify which attributes we want to observe
   * in `observedAttributes`
   *
   * @param {String} name attribute name (i.e. 'type' or 'command')
   * @param {String} oldValue the previous value
   * @param {String} newValue the new value we want
   */
  attributeChangedCallback(name, oldValue, newValue) {
    if (!this.shadow) {
      return;
    }
    const span = this.shadow.querySelector('.winner');

    if (name === 'type') {
      this.shadow.removeChild(span);
      this.addWinnerText();
    }
  }

  /**
   * Returns an array of the element attributes we want to observe
   */
  static get observedAttributes() {
    return ['status'];
  }

  /**
   * We create the actual image element and append it to our shadow dom
   */
  setupImage() {
    // Create an image
    const image = new Image();

    // Find the right image for the provided name
    if (this.getAttribute('name') === 'pete') {
      image.src = 'https://cdn-candidates.com/pete.jpg';
    } else if (this.getAttribute('name') === 'bernie') {
      image.src = 'https://cdn-candidates.com/bernie.jpg';
    }

    // We can use appendChild just like we do the normal document
    this.shadow.appendChild(image);
  }

  /**
   * Adds text to our image indicating a winner
   */
  addWinnerText() {
    // If the `status` is winner then add some text
    if (this.getAttribute('status') === 'winner') {
      const winnerSpan = document.createElement('span');
      winnerSpan.classList.add('winner');
      winnerSpan.innerText = 'Winner!!!';
      this.shadow.appendChild(winnerSpan);
    }
  }

  /**
   * Create the styles for our candidates
   * We do this as a normal string rather than using @import
   * since it is not supported in all browsers
   *
   * (same for new CSSStyleSheet, which is only supported in Chrome)
   */
  createStyles() {
    const styleTemplate = `
    <style>
    .winner {
      position: absolute;
      color: white;
      font-size: 30px;
      top: 10px;
      left: 160px;
      height: 30px;
      font-weight: 800;
      text-transform: uppercase;
    }
    </style>`;
    this.shadow.innerHTML = styleTemplate;
  }
};

/**
 * Register our custom element
 */
window.addEventListener('DOMContentLoaded', () => {
  customElements.define('candidate-image', CandidateImage);
});
Now our component allows us to specify the status of a candidate and it will update with any change!
Real world examples for PBS NewsHour
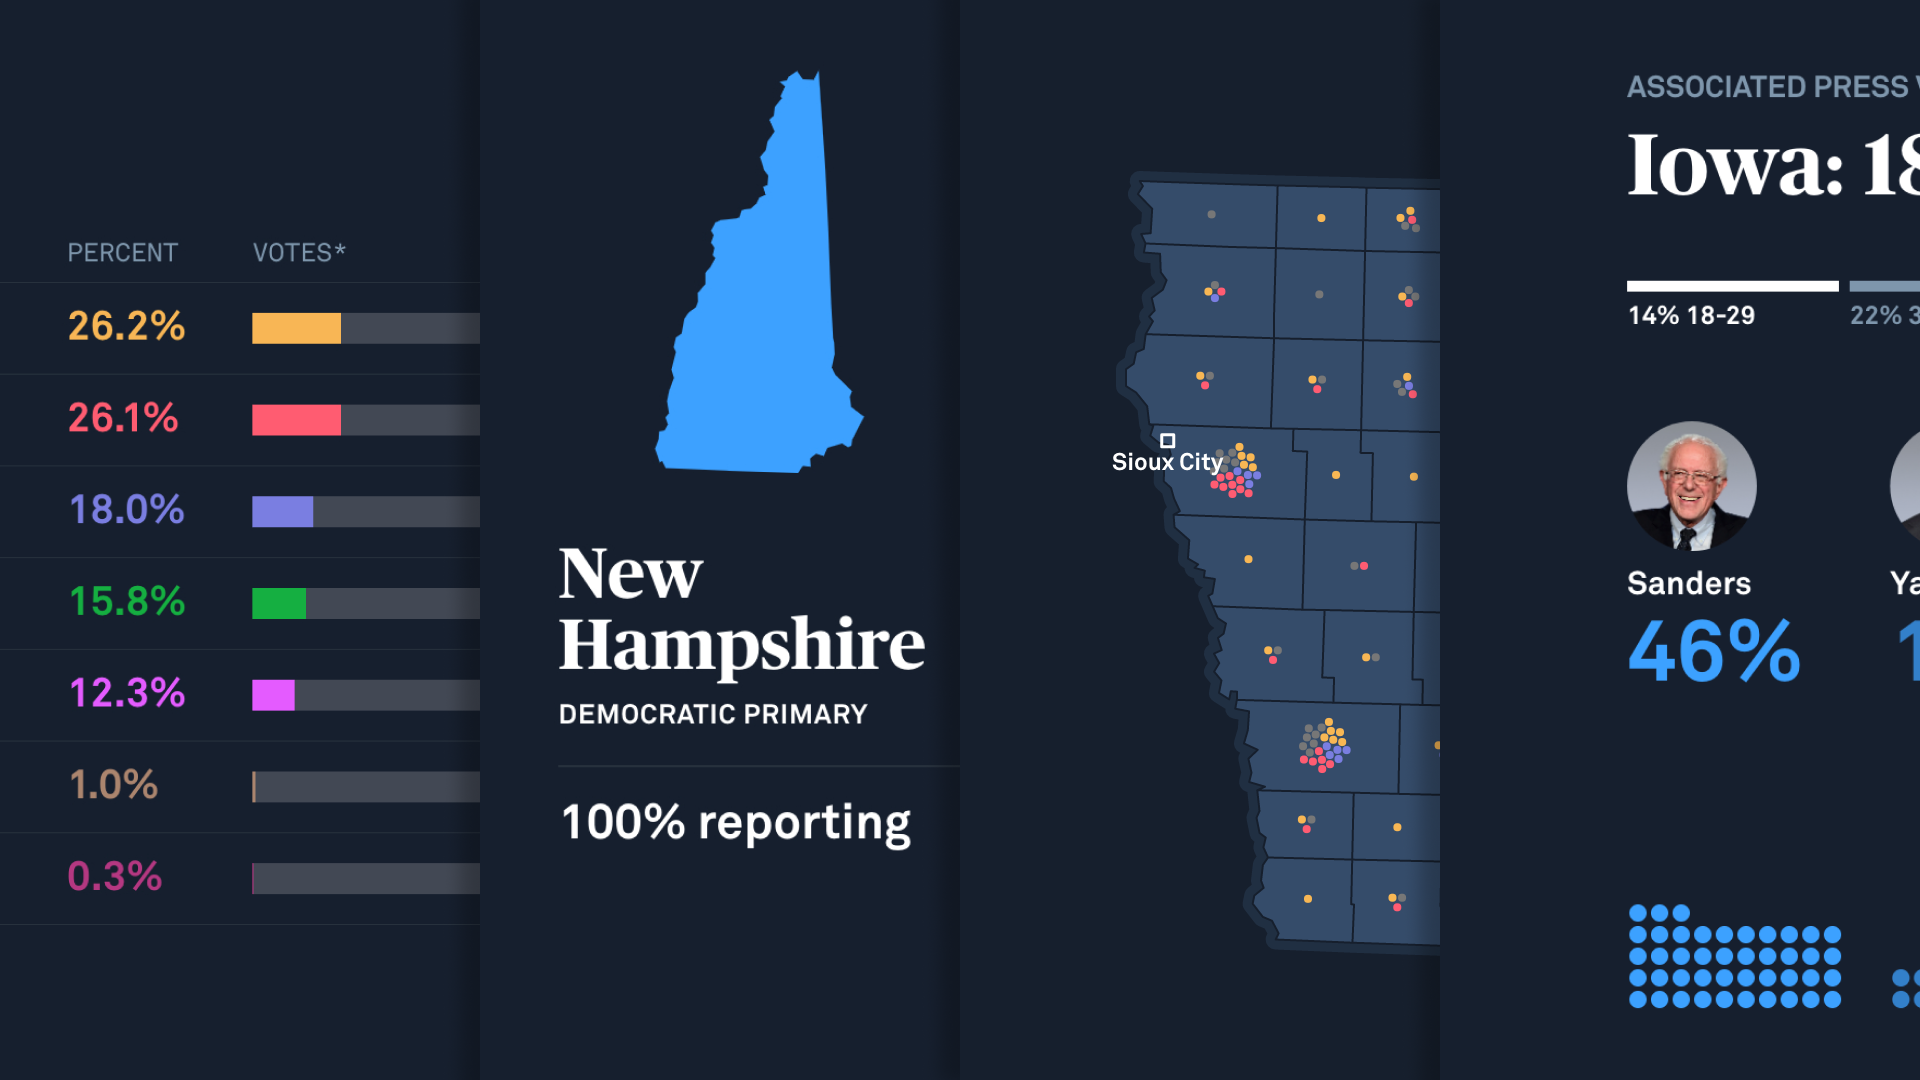
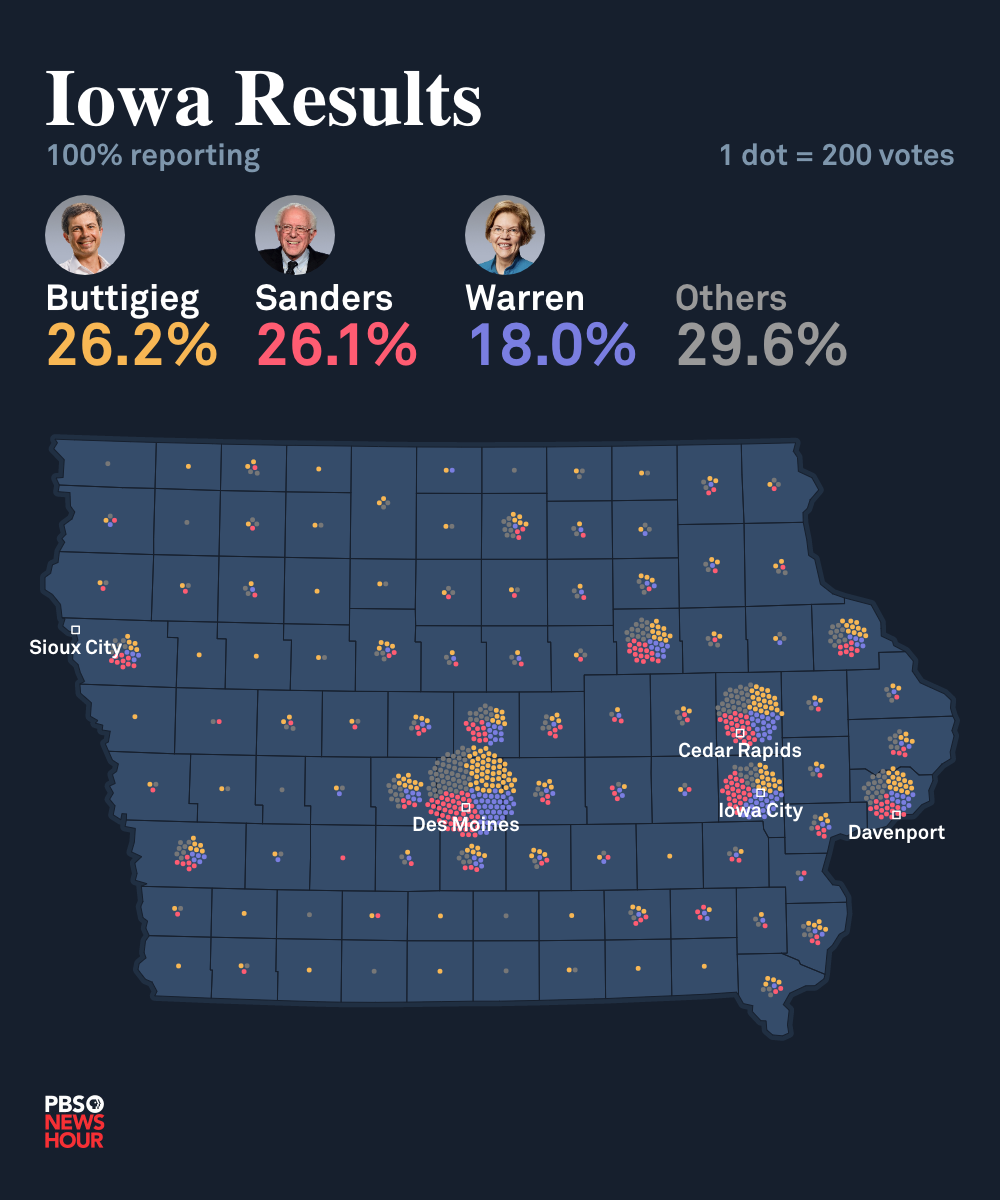
The candidate-image component is a trivialized example but it demonstrates all of the things we did for PBS NewsHour when building our election graphics. You can see a couple of them in practice on their “results” pages:
PBS NewsHour New Hampshire Election Results 2020
Or you can see them being used right in the middle of an article:
Sanders' narrow win ups pressure on moderates to coalesce
They even used them live on broadcast!
These were all built using default technologies available to us in the browser (no special library required). We simply make a request to their API to get the most up to date data and then populate some HTML we built within the components. No trickery or wizardry about it — it’s just JavaScript, HTML and CSS.
Originally published by Scott Batson on Upstatements's Blog.